Posts

Showing posts from September, 2019

All Static Mesh Complete

Image
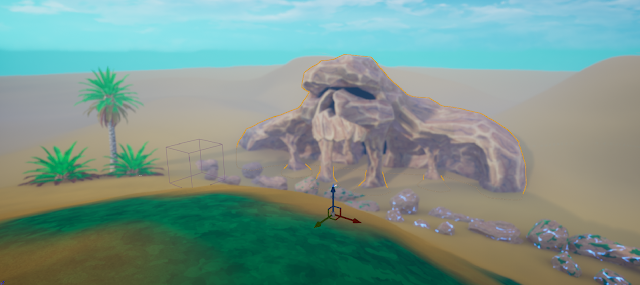
Here are all the static assets I intend to use to create the Environment: All the static assets ready to be turned into an environment. I'll probably add one more asset such as the grass if I get the time but this is more or less everything I intend to use. I also imported the Heat Distortion post-process I made back in 3rd year. I remembered learning this from the old UDK documentation which was one of the reasons that got me interested into materials:  https://docs.unrealengine.com/udk/Three/PostProcessMaterials.html Although it's a pretty old technique, it still makes a pretty good effect to this day. I have textured the Dungeon Entrance and the palm trees with Substance Painter. For the Dungeon Entrance, I have set up the material the same way as the rocks so it will have all the same features like terrain blending, sand and moss etc. I decided to change the sand again. I wasn't satisfied with the way it looks. The sand seemed to look wet. I might go back

Palm Tree Textured

Image
I really liked the date palm tree used in assassins creed origin. I based my palm tres on that except without the dates, Date Palm Tree in Assassin's Creed Origin I used Palm tree bark texture from Textures.com and modified it by making it tileable and used a cutout filter to make it stylised. After doing this just textured the rest tree trunk in substance Painter. I Handpainted the textures on the leaves.  Before I textured the tree, I planned ahead and I assigned the branches in 3 separate materials, One for wilted leaves, semi wilted and fully green leaves. It's just so that the transition is easier to implement. In UE4, I then use the nodes in the material editor to control the wilt amount on the Branches. Also, I added in the terrain blending from the rocks.  The result you get when assigning a material to certain leaves instead of all of them As for the Fern, I used the palm tree model as the base and removed the trunk and the branches that won

Landscape

Image
I wanted to make Journey's Sand in UE4 and I revisited the Sand Rendering Journey talk by John Edwards: https://www.youtube.com/watch?v=wt2yYnBRD3U When I first saw this presentation I couldn't understand how it was made now that I've got a good idea of the Material Editor. I understand some parts of how to make the glitter effects in Journey. I have also seen a similar approach on Twitter by Rob Fichman: got a lot of people asking how i do my sparkly effects and i love the shader tutorials by @minionsart so i got inspired to make my own!! gonna go more in-depth in the replies #gamedev #madewithunity pic.twitter.com/yfKO93yRq7 — rob fichman @ i ✨💖✨ my gf (@bobacupcake) January 29, 2018 Using the stuff I've learned from making the water material along with the Twitter post, I was able to make this sand in UE4: Overview of all assets and the landscape material test One thing that I lack in the landscape is the Oren-Nayer Shading from Journey. But fro

Pivot Painter

Image
I was initially thinking of not using Pivot Painter but since I am working on creating the foliage for the environment, I  decided to go ahead with it. I never really liked the Simplegrasswind node as that didn't produce convincing results. Even though you can modify its animation by other masking techniques, I still didn't like the motion it produces. In my 3rd year on my BA course, I used a simple Sine motion for the foliage which was great as a simple animation but I wanted more control based on wind direction and strength.  Later, I found out that there was something called Pivot painter. A feature that isn't mentioned quite often. Here is a good comparison of Pivot Painter and Simple grass Wind: https://www.youtube.com/watch?v=3u_576Pdcu0 There aren't many resources to go with on Pivot Painter but the Content Examples map, the UE4 Documentation:  https://docs.unrealengine.com/en-US/Engine/Content/Tools/PivotPainter/PivotPainter2/index.html and tutorial by Ab

Dungeon Entrance Sculpt

Image
Here is the sculpted version of the Dungeon Entrance: I have decided to go with the One Mesh Workflow instead of Modular pieces. This way is slightly faster. However, I will split the UVs into separate materials so that the Texel Density is consistent and nothing is lost.

Final Water Polish

Image
When I first created the Gerstner Wave I left it in a separate material in which I didn't intend to integrate it into the water system until after I had finished adding other features. This was because I was being a bit cautious. I didn't want it to break like the Render target fluid simulation broke. Now that I have added the Gerstner Wave it has opened a few doors to changing the aesthetics and functionality of the Water system. So this is a bit of a crazy update on the water system. Gerstner Wave Gerstner waves are supposed to be stacked on top of each other otherwise it just looks like a sine animation. I remembered this from the tutorial by Dokipen where he stacked 4 Gerstner Waves on top of each other. Another Example is in Ryan Brucks's Distance field water shader where he mentions he stacked 8 Gerstner waves in the description of his video. I saw a really cool water system in a tweet about the water in Blazing Sails and I wanted to reach out to the developers to