Posts

Showing posts from 2019

MA Course Summary and Reflection

Image
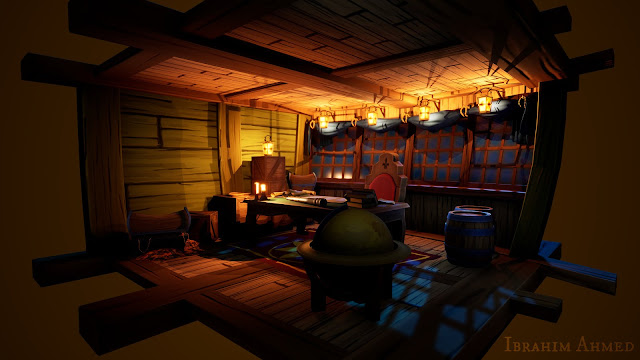
In this project a static Pirate cabin environment, a weather particle system, an explosion particle, custom world aligned materials and fluid simulation in bottles were created. In addition, a water system with 7 different features, a Pivot Painter asset, a dust material and a dynamic game environment were created. It was learned that most of the game art trick assets encountered tended to begin with either blueprints, external rigging and animation or materials. They then utilised other animation techniques if necessary, such as particle systems for VFX and animation blueprints for physics animation. At the beginning, an experimental Pirate Cabin project was created to consider whether the animation techniques project was worth pursuing. Weather Particle using Niagara Particle system Explosion VFX Using Niagara particle system. World Aligned Rain Material  Bottle Fluid Simulation Finally, an environment was created showcasing the Water system with 7 modular

Final Environment

Image
Here is the final environment: After creating all the initial assets for the environment, I level designed and put the assets into place. I then set up the water system including adjusting the Gerstner waves on the ocean and the lake. I then put the river onto a spline following this Livestream tutorial by Zac Parrish:  https://www.youtube.com/watch?v=wR0fH6O9jD8 I was initially skeptical about lookup tables for post-processing but I decided to give them a go and they are amazing! I was able to get the results and the colours I wanted on the sand as well as the overall environment. Lookup tables are very easy to implement and give you a lot of control. You make all the adjustments on a screenshot of the environment. You then apply the same adjustments you made on the screenshot to the lookup table texture, import to UE4 and see the magic.  Here is the documentation:  https://docs.unrealengine.com/en-US/Engine/Rendering/PostProcessEffects/UsingLUTs/index.html Next, I

All Static Mesh Complete

Image
Here are all the static assets I intend to use to create the Environment: All the static assets ready to be turned into an environment. I'll probably add one more asset such as the grass if I get the time but this is more or less everything I intend to use. I also imported the Heat Distortion post-process I made back in 3rd year. I remembered learning this from the old UDK documentation which was one of the reasons that got me interested into materials:  https://docs.unrealengine.com/udk/Three/PostProcessMaterials.html Although it's a pretty old technique, it still makes a pretty good effect to this day. I have textured the Dungeon Entrance and the palm trees with Substance Painter. For the Dungeon Entrance, I have set up the material the same way as the rocks so it will have all the same features like terrain blending, sand and moss etc. I decided to change the sand again. I wasn't satisfied with the way it looks. The sand seemed to look wet. I might go back

Palm Tree Textured

Image
I really liked the date palm tree used in assassins creed origin. I based my palm tres on that except without the dates, Date Palm Tree in Assassin's Creed Origin I used Palm tree bark texture from Textures.com and modified it by making it tileable and used a cutout filter to make it stylised. After doing this just textured the rest tree trunk in substance Painter. I Handpainted the textures on the leaves.  Before I textured the tree, I planned ahead and I assigned the branches in 3 separate materials, One for wilted leaves, semi wilted and fully green leaves. It's just so that the transition is easier to implement. In UE4, I then use the nodes in the material editor to control the wilt amount on the Branches. Also, I added in the terrain blending from the rocks.  The result you get when assigning a material to certain leaves instead of all of them As for the Fern, I used the palm tree model as the base and removed the trunk and the branches that won

Landscape

Image
I wanted to make Journey's Sand in UE4 and I revisited the Sand Rendering Journey talk by John Edwards: https://www.youtube.com/watch?v=wt2yYnBRD3U When I first saw this presentation I couldn't understand how it was made now that I've got a good idea of the Material Editor. I understand some parts of how to make the glitter effects in Journey. I have also seen a similar approach on Twitter by Rob Fichman: got a lot of people asking how i do my sparkly effects and i love the shader tutorials by @minionsart so i got inspired to make my own!! gonna go more in-depth in the replies #gamedev #madewithunity pic.twitter.com/yfKO93yRq7 — rob fichman @ i ✨💖✨ my gf (@bobacupcake) January 29, 2018 Using the stuff I've learned from making the water material along with the Twitter post, I was able to make this sand in UE4: Overview of all assets and the landscape material test One thing that I lack in the landscape is the Oren-Nayer Shading from Journey. But fro

Pivot Painter

Image
I was initially thinking of not using Pivot Painter but since I am working on creating the foliage for the environment, I  decided to go ahead with it. I never really liked the Simplegrasswind node as that didn't produce convincing results. Even though you can modify its animation by other masking techniques, I still didn't like the motion it produces. In my 3rd year on my BA course, I used a simple Sine motion for the foliage which was great as a simple animation but I wanted more control based on wind direction and strength.  Later, I found out that there was something called Pivot painter. A feature that isn't mentioned quite often. Here is a good comparison of Pivot Painter and Simple grass Wind: https://www.youtube.com/watch?v=3u_576Pdcu0 There aren't many resources to go with on Pivot Painter but the Content Examples map, the UE4 Documentation:  https://docs.unrealengine.com/en-US/Engine/Content/Tools/PivotPainter/PivotPainter2/index.html and tutorial by Ab

Dungeon Entrance Sculpt

Image
Here is the sculpted version of the Dungeon Entrance: I have decided to go with the One Mesh Workflow instead of Modular pieces. This way is slightly faster. However, I will split the UVs into separate materials so that the Texel Density is consistent and nothing is lost.

Final Water Polish

Image
When I first created the Gerstner Wave I left it in a separate material in which I didn't intend to integrate it into the water system until after I had finished adding other features. This was because I was being a bit cautious. I didn't want it to break like the Render target fluid simulation broke. Now that I have added the Gerstner Wave it has opened a few doors to changing the aesthetics and functionality of the Water system. So this is a bit of a crazy update on the water system. Gerstner Wave Gerstner waves are supposed to be stacked on top of each other otherwise it just looks like a sine animation. I remembered this from the tutorial by Dokipen where he stacked 4 Gerstner Waves on top of each other. Another Example is in Ryan Brucks's Distance field water shader where he mentions he stacked 8 Gerstner waves in the description of his video. I saw a really cool water system in a tweet about the water in Blazing Sails and I wanted to reach out to the developers to

Vertex Paint Flow map and flow map visualisation

Image
There aren't many tutorials to go with when it comes to Vertex painting Flow maps. I was going to use the concepts that are in UnrealSimon's Flow map Tutorial:  https://www.youtube.com/watch?v=tEr3NE_XLbc   But luckily I found one tutorial by TharleVFX which uses more or less the same process as the flow map texture technique in Unreal Simon's tutorial but uses vertex painting the way I want it:  https://www.youtube.com/watch?v=hDH25HnFneQ . I also wanted a way to visualise the Flow map and distortion of the water system. It can be difficult to see in different lighting conditions especially with the unlit water system I have made. I remembered an old twitter post by H.Kudo: Flowmap Fields Visualizer UE4でフローマップの流れを可視化してみる フローマップはFusion 9で作成 ※音がでます Visualize Flowmap Fields in UE4 Generated Flowmaps in Fusion 9 #UE4 #Fusion9 #RealTime #DataVisualization #indiedev pic.twitter.com/5pDqwBHjN3 — h.Kudo (@_KudoHiroyuki) July 1, 2018 I really like how he

Fluid Simulation Broken 😞

Bad news, since the water system has been changed significantly the Fluid Simulation feature has broken. The material/blueprint connections have somewhat been affected. It will require more time to fix and with the amount of time I have left for the project, I'm afraid I will have to leave this feature out of the waters system. Who knows, if I get a bit of time I might be able to add it later on but for now it will be removed from the water system.

Dungeon Entrance Blockout

Image
I've made a block out model of the Dungeon entrance in Blender. I'm a little confused whether to cut this into modular pieces or if I should make it as one big piece. If I model as one piece there will be issues with texel density but modular pieces will produce weird results when trying to put things together. Dungeon Entrance Blockout Whichever way I choose, I still have to sculpt, bake and texture the asset.

Rocks

Image
I have finished making 6 Rocks: It might not look much but there is a lot going on in the material. I still wasn't satisfied with the rock's plain base colour information so I overlayed a Noise in substance painter. Moss When I looked at the actual concept art, I forgot to add in some moss variations. So I added Moss variations in substance painter. Since Metallic Map wasn't being utilized I used the moss as a mask and controlled that through the material. I went a bit further and added the option to paint over or remove the Moss pattern with vertex painting. I could add moss based on the vertex Normals where all faces pointing up will be covered with moss but I wanted to use vertex painting to add an extra level of control and produce more or less the same result. Mossy Rock in the metallic map. It can also be Vertex Painted on top. Moss has Fuzzy Shading (Will talk more about it in Normal based Sand/Moss)  Then, I thought about adding more functionality

Git

Image
In a humble bundle game development bundle I purchased, I found one tutorial on learning how to use Git Version control from Udemy (Git Smart: Learn Git The Fun Way With Unity ). I have heard about version control like Perforce a few times in the past and it was recommended that I learn how to use it. I thought I'd see what its all about and try it out since it is a short course. I have put the project into Git version control so I do not have to create manual backups for each iteration like I have been doing in the past. It also saves space on the hard drive. It can also 'respawn' your project if you accidentally delete it as if nothing happened to it. It feels easy like saving a game except you are doing the same with a project. However, the main reason I am using it is that I can revert back to a change I made earlier. This gives me the freedo to experiment and not have to worry about messing up the project. This makes version control very useful and important for a

Blender 2.8 afterthoughts

Image
So I've been learning about Blender in the past week using tutorials from Blender themselves, Dallas Doan Maya to Blender tutorials ( https://www.youtube.com/playlist?list=PL5gK0C5TrIwdLSZHPnr9Up6LjhbIiFTJv ) and skimming through  one of  the Udemy tutorials (Blender 2.8 for beginners - Sword creation): https://www.udemy.com/blender-28-for-beginners-sword-creation/ There are a few things that are annoying about Blender and that is the UV Editor and 3D Cursor. The 3D Cursor comes in the way when modelling and the UV editor lacks in certain features like visualizing flipped faces. Although there is a workaround with an addon called Magic UV but it's not a great solution since I have to manually keep clicking on a button to update the colours of the flipped UVs,  Maya wins in this area.  As for the 3D Cursor, I was able to make an addon in my spare time as previously mentioned in an earlier post. Also, Ubisoft, a Triple A studio, have announced that they have switched to  Blen

3D Cursor Auto-Visibility Addon for Blender

I still wasn't too fond of the 3D Cursor so I went to  BlenderArtists.org . I was able to create this Addon in collaboration with a Python user, Iceythe, in the past 3 weeks in my free time. The addon reveals the 3D Cursor when you press the shortcut and then automatically hides the 3D Cursor when you use a different tool.  It was a good opportunity to do some python scripting since it's an important skill for a technical artist to have. However, Iceythe was able to enhance the script even further by adding a mini UI within the Addon in V2.0 (hopefully the last version) to change the keyboard shortcut easily. The old version V1.8 required manually calling one of the operator/functions in the keymap and changing the shortcut manually in the script for the other operator which is a bit unintuitive. Anyway, I have managed to put this onto Github along with a wiki/instructions as someone on the Blender.community forums suggested:  https://github.com/IbyA/3D-Cursor-Auto-Visibil

Ray-Marching

The Fluid Simulation I made earlier using render targets broke as I made a lot of changes to the water system since I first made the render target. However, before I attempt to fix this I thought it might be a good idea to try and integrate another type of fluid simulation I saw on Twitter by Campo Santo's Matt Wilde. New on the blog: Matt Wilde ( @skilful ) dives deep into a scene cut from the announcement trailer. https://t.co/nPW71WjhC0 pic.twitter.com/Hlc8OZHrLf — Campo Santo (@camposanto) March 16, 2018 I was a little confused by what Signed Distance Field is and if it was related to the normal distance field I see in UE4. However, James Burton (White Paper Games) informed me that signed distance field are usually used in Ray Marching. He advised me to watch some Youtube videos on the subject.. He also mentioned that this was getting into Graphics programming territory. As much as I'd like to learn how this is made, I might have to leave this alone and atte

Distance Field Flow Maps

Image
I managed to integrate distance field flow maps into the waterfall using the basic concept from this Unreal Engine Forum Post:  https://forums.unrealengine.com/development-discussion/rendering/47456-distance-field-flow-map I then combined this with the techniques I learned from the free assets on the Unreal Engine Marketplace called River Water Tool with Flow Buoyancy by James Stone:  https://www.unrealengine.com/marketplace/en-US/slug/river-water-tool-with-flow-buoyancy I was also studying up Ryan Bruck's GDC presentation on distance fields and compared with his approach:  https://www.gdcvault.com/play/1026262/Technical-Artist-Bootcamp-Distance-Fields One thing that piqued my interest in Ryan's work is how he included a regular normal map of the small stones which controls the flow of the water. The stones are just part of the landscape material using height data. It's a pretty nifty trick. Changing the flow of water through the use of the regular normal map in Fo

Establishing Workflow for the Environment

Image
I've been doing some research and looking into how I'm going to create the environment. I needed to establish a workflow for stylized projects so I've been working on creating the first model: First meshes tend to take a while to make because I'm trying to get to grips with establishing the art style, the modeling, texturing and rendering techniques and the workflow process. Hopefully, now I can speed up a bit in creating some of the assets.

Blender 2.8

Image
Blender 2.8 UI - Very easy to read and when you hover your mouse over something, you get a tooltip explaining what that thing does. This might seem like a review but I wanted to share my views on Blender. Last year, Blender 2.8 was released and I have been watching its development every now and then to see how it compares to other 3D Modelling software. It's been popping up here and there on 80.lv and I found that there is a pivot painter addon for Blender. So I thought I'd finally try out Blender 2.8, after using it occasionally in my spare time. The software is INCREDIBLE! I more or less understood how the software worked. Everything was explained in the UI. I set the keyboard shortcuts to Industry compatible (a bit like Maya's navigation). 3D Cursor in Blender  - Always there in the way One thing that did bother me is the 3D Cursor. It feels really odd and always in the way. Does it really need to be there all the time? There is an option to hide it but I w

Planning Stage for the Environment

I've broken down the environment assets into a list: -Rocks -Skull Rock -Mountains? -Grass, Plants -Palm tree -Water system -Desert landscape that includes:     - Sand Material variation     - Moss Material? I was researching ways to make my own sort of stylised environment. I also made some modifications by making the skull waterfall appear as if it came from underground as a dungeon entrance that recently erupted from the ground and not as part of a mountain. But at the moment that's something that needs further research. After finishing the tutorial from substance designer I made some initial textures. I do plan on using these textures as part of the sand material for the landscape of the environment. I also hope to make it look similar to Journey's Sand.

Substance Designer afterthought

I finished going through the basics of Substance designer tutorial. I think I more or less grabbed the concept of how to work with the software but I'm thinking of using Substance Designer to make initial textures like some noise and then use UE4 to complete the whole material. I could use the Substance plugin and its a great plugin but I prefer not to use an external plugin. I want to try and use UE4 in its normal form and I don't want to get issues later on. It's now onto making the textures for the environment. First, I need to make some Sand and rocks texture. So I will be focusing on that.

Substance Designer

Image
I've not worked with substance designer in a while since year 3 of BA Games Design Course. I never thought I'd need to use it because I prefer using the traditional sculpting/painting techniques to create the textures. After learning a good deal with UE4's Material Editor, the thought process of creating procedural materials can be transferred to Substance designer. It might also teach me something that I haven't learned in UE4's Material Editor. Anyway back to the matter, I need to relearn Substance Designer to create the material for the landscape in the Environment.  So I'll be following these tutorials as fast as possible:  https://academy.substance3d.com/courses/Creating-your-first-Substance-material/youtube-y8q6-tgQjZc

Stencil

Image
Last year I remember reading up on of one of the Blog posts on Simon Schreibt, Assassin’s Creed: Black Flag – Waterplane, where he explains how in Assassins creed Black flag the water is hidden when boats are overlapping the water plane. I was really curious how this is done so I thought I'd try this out for myself. I did some research on how i can do this and found a tutorial by Nilson Fernandes de Lima where he uses Stencil to mask out water for boats:  https://www.youtube.com/watch?v=69YfV8ru-ZM&list=PLfJSXC5qE3FxxKvT2-l2CN6qTSvGdgVq9 I have managed to implement his method into the water system: Cube setup to custom depth stencil value to 8. When not rendered in main pass, it can be used to hide the water Plane. Material Setup for custom Depth Stencil if it's equal to the stencil value parameter then the opacity is set to 0 Settings for Stencil in the details panel of the object. Custom Depth Stencil Value must be the same as the material parameter otherw

Environment Showcase Concepts

Image
I thought it's about time to start working on creating the environment to showcase the water in the best way possible. It was suggested that I create this really cool Skull Waterfall environment concept art by Andrey Egorov: However, I will be using this concept as my initial inspiration and will be making my own iteration to the environment so it will not look exactly the same as the concept. It takes a bit of time figuring out and creating some of the features for the water shader. While I do this, I can work on creating the environment so I will be working on the water shader in small increments.

Waterfall

Image
I used everything I've learned from creating the water and used it as part of the water. However, I had to modify certain areas of the map such as the Normal, Highlights, Colour and a few other changes. An extra feature I added was to vertex paint the opacity in case of manually hiding away certain areas of the waterfall. With some further minor modifications, It might also be used as River easily. During development, I was able to produce this nicer deep blue effect. I preferred that method more but it wouldn't make a convincing waterfall/river. Foam As mentioned in the previous post, I used the Vertex Normal along with Distance fields and Vertex painting. However, I made it so that the foam is distorted based on the normals of the river as having it like the sea shader would look weird because of its calm looking nature.

Waterfall Foams

Image
Reflection Initially, I was thinking of making the whole water system into a landscape. However, when I thought about waterfalls, it complicated things as it would look weird in certain areas. It might be best to keep things as separate assets instead. I'm not saying that the landscape water system is off the table as I still need to do some further experiments to fully decide on what sort of water would be best. Another thing about creating waterfall is that it might be easier to convert into a river system which I might utilise in vertex painting the flow maps or landscape layer. Research I've been looking into making foams for the waterfalls and there are many different approaches. The most common approaches I've seen is using vertexnormals that JoyceMinionsArt uses, Vertex painting that UnrealSimon uses and distance fields/Depth fade that Tritonethegame uses. Waterfall From Rime Using normals and triplanar noise to make a stylized waterfall :) #gamede

Using Time in Materials

Image
I realised this a bit late but I noticed that time can be expensive in materials and the number it outputs just accumulates over time. Its good practice to add some way of looping the time by adding a Frac node so it loops to values over time instead of accumulating. Time with Frac to ensure the value stays within decimal value Other methods of loop the Time Node Big thanks to Unrealsimon ( https://www.youtube.com/watch?v=tEr3NE_XLbc )  and Tech art Aid ( https://www.youtube.com/watch?v=bu8kGs1ap54 ) for pointing this out in their videos. I've gone through all of my materials and made sure to do this.

Water Sparkles

Image
Its been a pretty busy few weeks but I was able to carry on working on the project incrementally. Before going onto working on flow maps and the waterfall (final two aspects of the water system), I wanted to try integrating the water foam I made into the overall colour I made. I was able to improve the colour of the water a bit more and managed to add some glitter effect by using a dotproduct on the Normal maps. I still feel that the colours could be improved further as you can't see the normal map coming into play on an unlit material. I might need to play around and do some further experimenting. Water System

Camera/Object Fade

Image
Object fades based on camera position This is a bit of a side-experiment i wanted to do. I found a Twitter post by Tom Looman where he made a character fade: Quick character fade test using Dithered Opacity Mask in @UnrealEngine 4.11 (with TemporalAA enabled) pic.twitter.com/XJ73XfPGiq — Tom Looman (@t_looman) April 17, 2016 I wanted to try figuring how to fade object while ensuring it keeps its lighting properties, like the way he made. From what I can gather from his tweet the material he used was masked which makes sense as it keeps all the lighting information. Also translucent would just look weird. He enabled Dithered Opacity Mask and Temporal AA along with some material Maths: @Scourged_Wolf @UnrealEngine Dither effect is just a checkbox (in 4.11) and material FX blends alpha, cam pos vs obj pos distance — Tom Looman (@t_looman) April 20, 2016 Here is the material setup: Material Setup using Tom Looman's approach. I divided it by the object ra